Timeline
Tracks and clips
Place, trim, layer and route the clips of a timeline.
Tracks are the rows of a timeline; clips are the blocks on them. Laser tracks hold cues, nested timelines, effects and laser streams. Video tracks hold video.
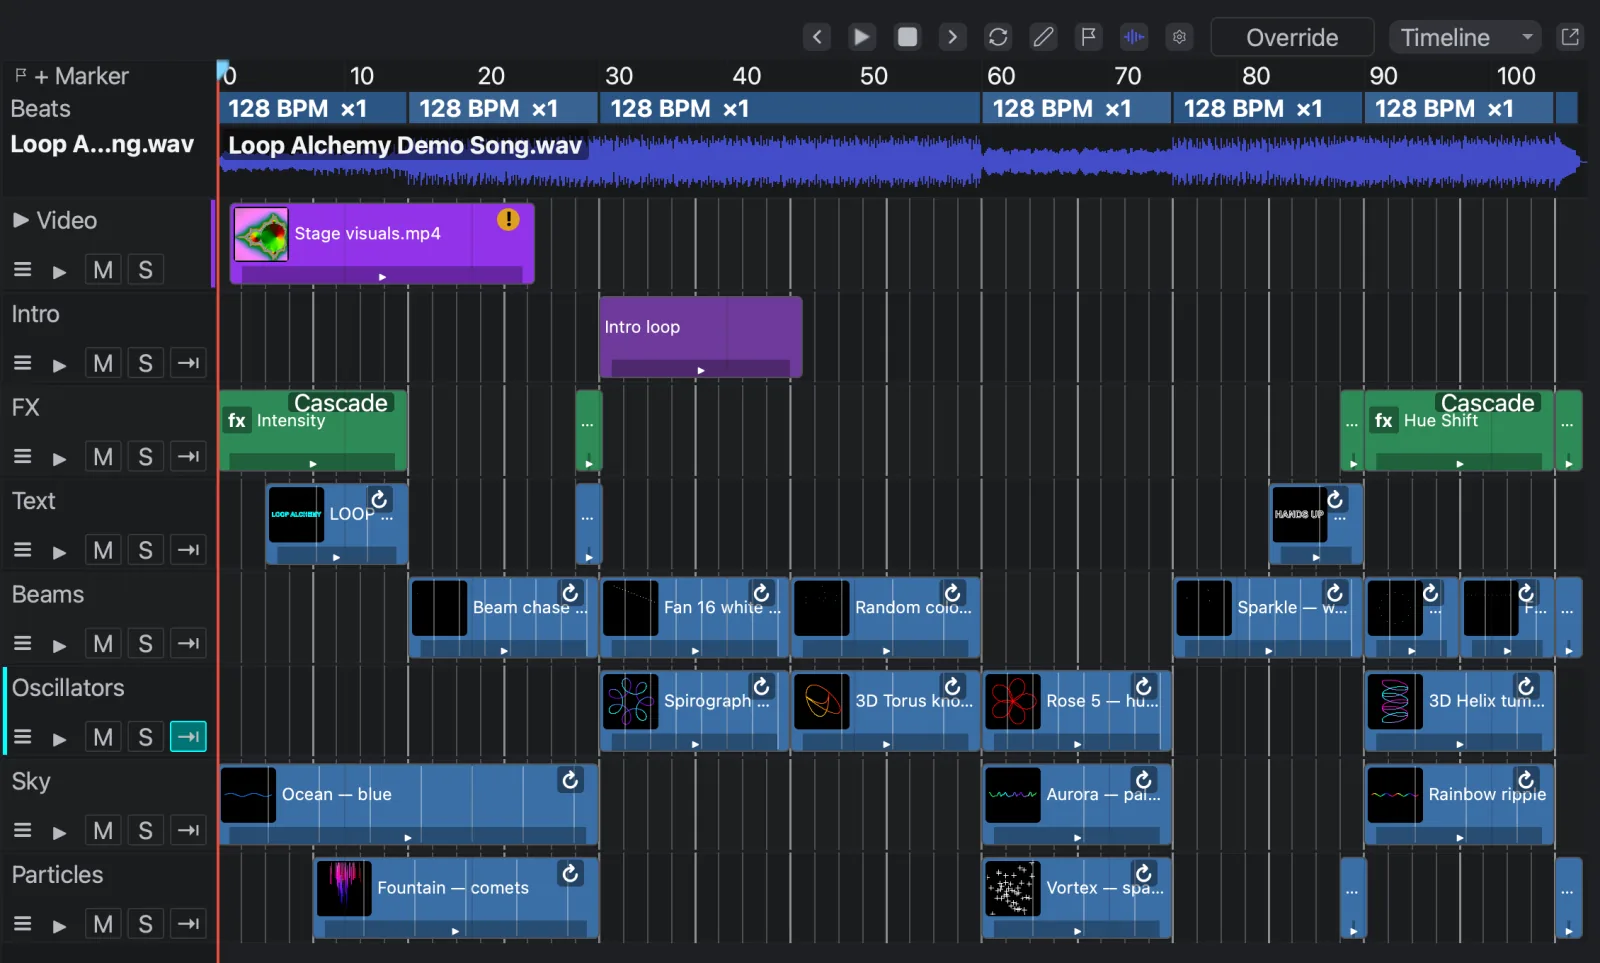
How tracks combine
- Laser tracks add up: two cue clips at the same moment both draw, on whatever zones they are routed to. Order doesn't hide anything, the way it would in a video editor.
- Order matters for effect clips: an effect clip changes the tracks below it, not above. See Timeline effects.
- A track's Opacity lane (▸ on the header) fades everything on it. See Keyframes and automation.
- Video tracks are stacked by their clips' Blend mode, top over bottom. See Audio and video.
Clip types
| Clip | Colour | How you add it |
|---|---|---|
| Cue | Blue | Drag a cue from the Cues page or the cue editor's list, ⌘-drag (macOS) / Ctrl-drag (Windows) a pad, or drag a Cloud Library tile |
| Nested timeline | Purple | Drag a timeline from the Timelines list |
| Effect (fx) | Green | Right-click an empty part of a track. See Timeline effects |
| Laser stream | Brown | Import timeline…, or Import back from the render queue. See Exports and mixdowns |
| Video | Drag video files onto a track. See Audio and video |
A cue clip refers to the cue; it doesn't copy it. Edit the cue and every clip of it changes. A new cue clip is 4 seconds long; trim it to fit. Lines on the clip mark each repeat of the cue, or shading where it holds its last frame.
A nested timeline clip plays the whole other timeline, as long as that timeline. A timeline inside a nested timeline is not played (one level only).
A clip whose file can't be found shows a red missing tag. Click it, or choose Locate file…, and find the file: every clip using it is relinked.
Place, move and trim
- Add tracks with Add Track or Add Video Track in the right-click menu of a track header, a track or empty canvas. A track with locked clips can't be deleted.
- Clips snap to the beat grid (inside a beat section), to the plain grid elsewhere, and to the edges of other clips.
- Trimming the left edge of a laser stream or video clip moves its in-point too: the clip still shows the same moment of the file at the same time.
- A locked clip can be selected but not moved, trimmed, cut, deleted or automated. Lock finished parts of a show so a stray drag can't move them; unlock from the right-click menu.
Shortcuts are in Keyboard and mouse shortcuts.
The clip bar
Select a clip to edit it in the bar under the toolbar. Most fields explain themselves; these need a word:
- Gain (0 to 1) sets the clip's brightness. Gain keyframes override it.
- Pre-rendered (laser streams): on, the points already have their zone geometry and projector settings, as in a mixdown. Off, they go through the zone like a cue.
- Loop (cue clips) decides what happens when the clip is longer than its cue. On, the cue starts again for as long as the clip lasts. Off, the cue holds its last frame, while oscillators and other moving parts keep running.
A loop-based cue's loops follow the BPM of the beat section they play in (the global tempo outside sections), so they stay on the grid. See How the timeline works.
Routing
By default each cue clip plays where its cue's tracks are routed (Cue routing). Routing a track or clip sends it somewhere else, without touching the cue:
- ⇥ on a track header sets the track's output.
- Send to in a clip's right-click menu sets one clip's output.
The choices are output groups (violet), zones (cyan) and virtual zones (yellow), as on the Routing page. A clip's choice wins over its track's, and a track's over the cue's. Routing a nested timeline clip moves everything inside it.
Use it to play the same cue on the left lasers in the verse and the right ones in the chorus.
A laser stream clip with no routing plays on every zone. After importing a mixdown, route each laser's track to its zone.