Routing
Colour calibration
Keep a projector's colours true at every brightness, match colours across projectors in Rec. 2020, and reuse the settings as a profile.
Lasers don't dim evenly: below a certain level one colour goes dark before the others, so a dim white turns blue or green. Colour calibration corrects each colour of a projector so a colour keeps its hue from 1 % to 100 %. It is off for every projector until you turn it on.
Colour matching, a second step, makes a colour value look the same on every projector. See Match colours (Rec. 2020).
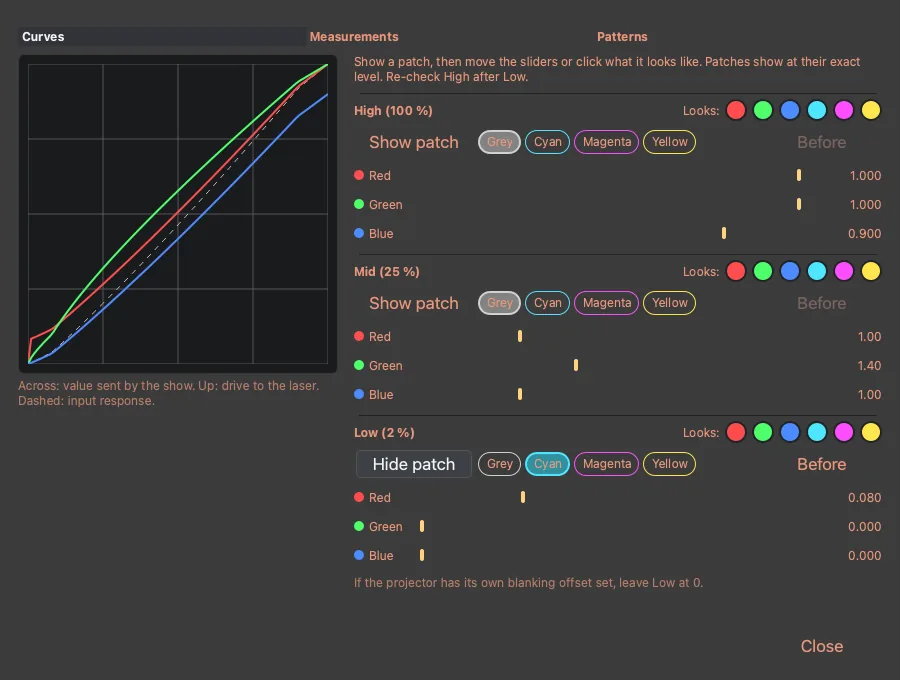
Balance a projector by eye
- On the Projectors tab, select the projector and turn on Colour calibration. The output must be armed, and master intensity at 100 %.
- Click Calibrate….
- In High (100 %), click Show patch. If the white patch has a tint, click the colour it looks too much like under Patch looks too:, or lower the strongest colour's slider, until it looks white.
- In Low (2 %), click Show patch and pick Red, Green and Blue in turn. Raise each colour's slider until that colour just appears: at 2 % a colour may not light at all until you do. Then pick White and click the colour it looks like until all three colours show and the patch looks white. Each click raises the other colours' start level a step.
- In Mid (25 %), show the patch and do the same.
- Check High again: High and Low affect each other a little.
- Show Cyan, Magenta and Yellow at each level too: a mix of two colours shows a threshold error that white can hide.
- Click Save as… on the Projectors tab to keep the result as a profile.
Patches show at their exact level: Test Pattern Intensity doesn't apply to them, so High is full power. Master intensity does apply.
Turn on Before next to a patch to see it without calibration, and off again to compare. Hold Bypass (hold) to compare everything the projector shows. Bypass all projectors does it for every projector. All three switch off when you leave the Routing page.
What it changes
Calibration fixes only the difference between colours. A value gives on average the same light as before, so fades, dim content and Power Maps keep their look. This is Native look, the default Input response.
| Input response | What it does |
|---|---|
| Native look | Keeps the look of existing shows; only the colour errors go. |
| Linear light | Light proportional to the value: 50 % gives half the light. Dim content gets brighter than before. |
The input response is one setting for the whole workspace. Calibration is never included in mixdowns, show packages or audio-DAC files: the projector that plays them applies its own.
Calibration is not offered on visualiser outputs (Depence, LaserViz, Video DACs). Some projectors and controllers (IDN projectors, BEYOND) can correct colour themselves: use one or the other.
Match colours (Rec. 2020)
Colour matching maps each projector's red, green and blue into one shared colour space: Rec. 2020 (BT.2020) with a D65 white. The same colour value then looks the same on every projector, as far as each can show it. A colour a projector can't reach shows as the nearest one it can.
It is off by default. It changes hues (full red becomes about 630 nm), so existing shows keep their look until you turn it on. Calibrate the curves first (above): matching works on top of them.
Enter the projector's colours
On the Colour tab of Calibrate…, under Primaries, give each colour one of:
- its Wavelength (nm), from the projector's spec sheet. No meter is needed.
- the x and y a colorimeter or spectrometer reads at full.
Then give one of these, so the colours can be weighed against each other:
- White: the x, y of full white with your curves on. Show the High White patch to measure it.
- each colour's Power (mW) at full, from the spec sheet or a power meter.
- each colour's Y at full.
If you imported a CSV or measured step by step (below), click From measurements instead.
Applying a CSV with x, y or wavelength_nm also fills in the primaries.
The chart shows the projector's colours as a solid triangle, the colours matching aims for as a dashed one, and D65 white as a circle.
Turn matching on
- Under Colour matching, choose the Target.
- Tick On. A window lists what will change: how much of its white brightness the projector keeps, what full red, green and blue now show as, and which colours are out of its reach.
- Click OK.
| Target | What it does |
|---|---|
| Rec.2020 (default) | Every value has one fixed colour. Projectors agree on the colours they can all show and differ only at the most saturated edges. Best for one projector, or several similar ones. |
| Rec.709 | The smaller colour space of HD video. Useful next to video screens. |
| Common gamut | Selected projectors agree on every colour. Best for mixed models side by side (below). |
| Reference projector | Matches this projector to another projector's colours. |
Laser primaries reach most of Rec. 2020, but not all of it. A typical 450 nm blue, for example, can't quite reach the Rec. 2020 blue at 467 nm.
White output turns colour matching off for that projector.
Match mixed projectors
When projectors of different models must look the same side by side:
- Enter the primaries on every projector.
- On one of them, choose Common gamut and tick the projectors to match with it.
- Optional: tick Brightness match to dim every projector to the dimmest one's white. It needs every projector's power, or every projector's Y.
- Check how much of its white each projector keeps, then click Match these projectors… and OK.
Matching turns on for each of them. Each projector gives up the saturation, and some brightness, that the others can't match. If you rename a projector in the group, click Match these projectors… again.
Projector profiles
A projector profile (.xprojector) holds a projector model's Calibration, Scan rate,
Colour shift, Min points and White output. Profiles are kept in
Documents/Excalibur Laser Systems/Loop Alchemy/Projector Profiles.
| Control | What it does |
|---|---|
| Import… | Choose a profile. A window lists each of its sections with the current and new value; only the ticked sections change, and only on the selected projector. |
| Save | Writes every section to the profile the projector came from. |
| Save as… | Writes a new profile, for example a second unit measured on its own. The projector uses that file from then on. |
| Clear | Turns calibration off and resets it to Linear. Other settings stay. |
The workspace keeps its own copy of each projector's settings, so a show plays the same on any machine. A profile file never changes a workspace by itself: if it was saved since you imported it, the projector shows Profile file changed and Re-import…. Not saved to file means you changed the projector after importing or saving.
Import measurements
If you have readings from a laser power meter or a colorimeter, import them as a CSV on the Measurements tab of Calibrate…. Only the colours in the file change. Export CSV… writes the same format.
# Laserworks projector measurements, format 1
# model: Example RGB 5W, unit: A, date: 2026-11-02
channel,drive_pct,power_mw,Y,x,y,wavelength_nm
red,0,0.4,,,,638
red,2,0.4,,,,
red,5,38,,,,
red,10,120,,,,
red,100,1520,,,,
| Column | What it holds |
|---|---|
channel |
red, green or blue (or r, g, b) |
drive_pct |
The level sent, 0–100. 0 is the dark reading. |
power_mw or Y |
The reading: power in mW, or luminance in any unit, the same unit throughout. A colour with both asks which to use. |
x, y |
Optional chromaticity of the reading. |
wavelength_nm |
Optional, on any row of its colour. |
- Use
.as the decimal point, whatever your system's language. Lines starting with#are comments. - Each colour needs at least 4 rows, 2 of them above the level where it starts to light. Measure several levels under 10 %: that is where colours shift.
- Errors list their line number, and nothing changes until the file has none.
Measure with the measurement patch
The Patterns tab has White steps, colour patches and Red, Green and Blue steps for checking, and a Measurement patch that sends one colour at a raw level for a meter. The steps show one colour alone from 1 % to 100 %, dense at the low end, so you can see where each colour starts to light. All of them show at their exact level and have a Before switch.
- Set master intensity to 100 %.
- Click Enable measuring… and confirm (once per session).
- Choose the colour and the Drive, then hold Hold to measure while you read the meter.
The level is capped at 50 %. Raise cap to 100 %… allows full power after a confirmation, until you leave the Routing page.
Measure step by step
Measure step by step on the Measurements tab walks through each colour at each level.
- Choose the colours, the meter (Power meter (mW) or Colorimeter (Y)) and the Levels (%), then click Start.
- Hold the button to show the step, type the reading and press Enter for the next step.
- Steps above the cap are marked. Type the reading from the spec sheet, or raise the cap on the Patterns tab.
- Click Use these readings, check the curves, and click Apply, as for a CSV.